How to write the test plan that actually gets used

Before you even think about writing a single test case, you need a game plan. A software test plan is that game plan—a strategic document that lays out the entire testing effort from start to finish. It’s where you define the project's scope, objectives, resources, and schedule to make sure quality is baked in, not bolted on.
Think of it as the blueprint that tells your team what to test, how to test it, and what "done" really looks like.
Why a Test Plan Is More Than Just Paperwork
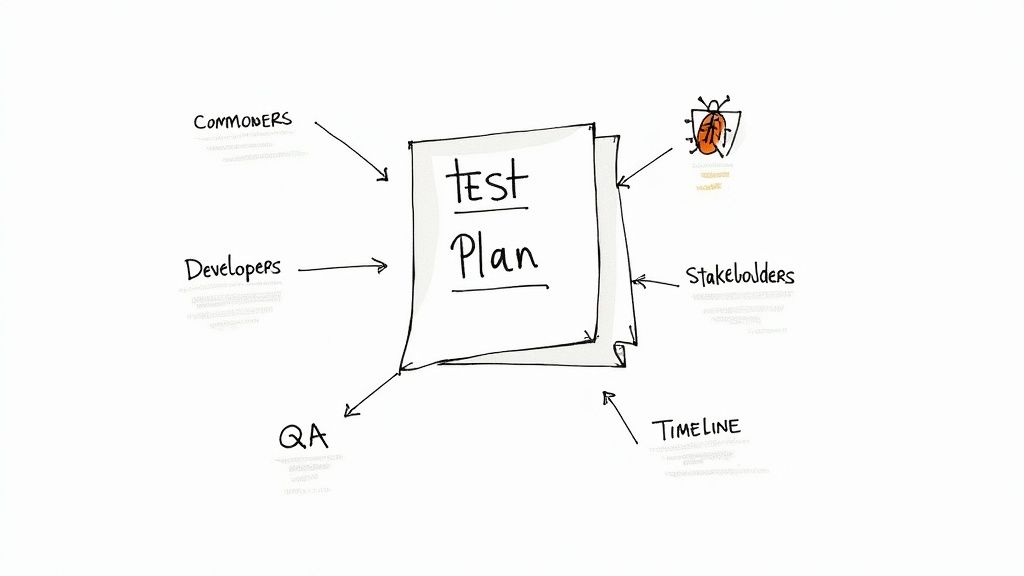
Let’s be real. A lot of test plans get written, filed away in a shared drive, and never looked at again. But when done right, a test plan is the command center for your entire quality effort. It’s the single source of truth that keeps developers, the QA team, and stakeholders all on the same page, saving everyone from the last-minute chaos of finding show-stopping bugs right before launch.
A truly effective plan is a communication tool first and foremost. It brings absolute clarity to the scope, the resources you have to work with, and the timelines you need to hit. It shifts testing from a frantic, reactive scramble into a proactive and predictable process.
The Business Case for Strategic Planning
Going beyond a simple checklist isn’t just good practice; it saves real money and gets your product to market faster. When the entire team understands the testing boundaries and goals, they can focus their energy on the features that carry the most risk. This means catching critical defects early in the process when they’re exponentially cheaper to fix. This structured approach is a core principle of effective quality assurance in software development.
The industry’s growth backs this up. The global software testing market is already valued at over $45 billion, and it's not slowing down. This tells you that businesses everywhere see the clear link between thorough planning and successful products. With North America alone driving 37% of that market expansion, it's obvious that meticulous test planning is seen as a competitive advantage.
A test plan isn't about boxing testers in; it's about empowering them. It provides the context, tools, and direction they need to explore the software meaningfully and find the bugs that matter most.
Avoiding the False Economy of Skipping a Plan
Thinking you can save time by skipping a formal test plan is a classic mistake—one that almost always backfires. When you fly blind without a documented strategy, you're essentially inviting disaster.
Here’s what usually happens:
- Scope Creep: Without clear boundaries, the testing effort balloons, pushing deadlines further and further out.
- Misaligned Expectations: A project sponsor might assume you’re testing a feature that was never even on the QA team’s radar.
- Wasted Resources: Testers might spend days on low-impact areas while a critical, customer-facing workflow goes completely unchecked.
- Inconsistent Testing: Without a unified approach, every tester does their own thing, leading to unreliable results you can't replicate.
At the end of the day, a test plan is your insurance policy against project failure. It’s the formal handshake that says quality is a priority, not an afterthought, and it gives you a clear benchmark to measure success against.
Building the Foundation of Your Test Plan
This is where the rubber meets the road. We're moving beyond abstract ideas of "quality" and creating a concrete, actionable document that will guide your entire testing effort. Forget generic templates; we're going to build the essential components every solid test plan needs, right from the ground up. Get this foundation right, and you'll ensure your testing is focused, measurable, and perfectly aligned with your project's goals from day one.
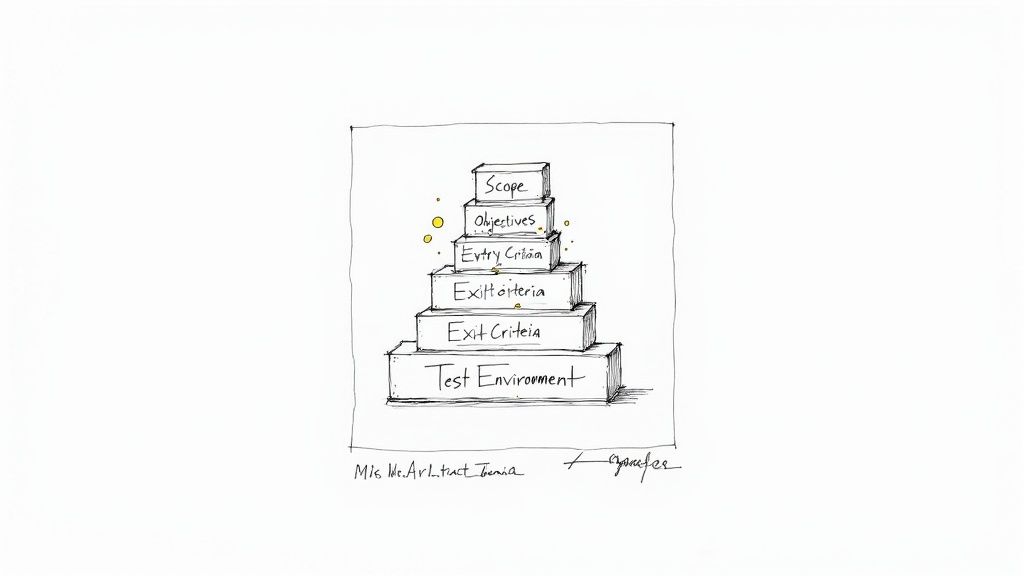
The very first thing we need to do is establish clear boundaries. Without them, testing efforts can quickly spiral out of control—a classic case of scope creep that I've seen derail too many projects.
Defining a Crystal-Clear Scope
The scope is your line in the sand. It explicitly states what you will test and, just as importantly, what you will not test. This isn't just about managing workload; it's about preventing misunderstandings and channeling your team's energy into the most critical parts of the application.
Imagine you're testing a new e-commerce checkout flow. Your scope should be laser-focused on that specific journey.
In Scope (What We're Testing):
- Adding items to the cart from the product page.
- Applying both valid and invalid discount codes.
- Processing payments through the credit card and PayPal integrations.
- Verifying successful order confirmation and the corresponding email notification.
Out of Scope (What We're Not Testing):
- User registration and login functionality.
- Browsing product categories or using the search bar.
- The "My Account" section or order history pages.
- Performance testing under heavy load (this should be in its own, separate plan).
By defining these boundaries upfront, you give your team a clear mandate. A well-defined scope almost always grows out of solid project requirements. If the specs are fuzzy, setting a clear testing scope is nearly impossible. For a great example of how detailed specifications should look, check out this helpful sample software requirements document for guidance.
Articulating Measurable Test Objectives
With the scope set, you need to define what success actually looks like. Test objectives are the specific, measurable goals of your testing. Vague goals like "make sure the app works" are completely useless. You need to tie your objectives directly to business outcomes and real user needs.
Good objectives are quantifiable and verifiable.
- Weak Objective: Test the login page.
- Strong Objective: Verify that users can successfully log in with valid credentials, receive a specific error message for invalid ones, and complete the "Forgot Password" workflow without issues on Chrome, Firefox, and Safari.
Another strong objective might be: "Achieve a 95% pass rate for all P1 (Priority 1) test cases related to the payment processing module before the release date." This gives the team a clear target and provides stakeholders with a tangible measure of quality.
Your test objectives should always answer the question, "Why are we running these tests?" If your first thought is just "to find bugs," you need to dig deeper. The real purpose is to validate functionality, reduce business risk, and build unshakeable confidence in the product.
Establishing Entry and Exit Criteria
Think of entry and exit criteria as the guardrails for your testing cycle. These are the non-negotiable conditions that must be met to start and finish a phase of testing. They're critical for preventing QA from starting on unstable code or, on the flip side, continuing to test indefinitely.
Entry Criteria (The Green Light to Start):
- The development of all in-scope features is 100% complete.
- The test environment is stable, configured, and ready to go.
- All critical unit and integration tests are passing.
- The test team has reviewed and formally approved the test cases.
Without these, you risk wasting valuable QA time on a build that just isn't ready, which only leads to frustration and a mountain of inaccurate bug reports.
Exit Criteria (Knowing When You're Done):
- A minimum of 95% of all planned test cases have been executed.
- There are zero open critical or blocker defects.
- Fewer than five major, non-critical defects are still open (and they are all documented with a plan for a future release).
- All high-risk areas have been tested and signed off by the QA lead.
These criteria remove all the guesswork from the release decision. It’s no longer about a "feeling" of readiness; it’s about meeting a predefined quality bar that the entire team has already agreed upon.
Specifying the Test Environment
The test environment is the stage where the entire performance takes place. For your results to mean anything, this stage must mimic the real world—the production environment—as closely as humanly possible. I can't tell you how many times the dreaded "it works on my machine" problem has come down to inconsistencies between test and production.
Your test plan must detail every crucial aspect of this environment. To make it clear, here’s a quick breakdown of what you need to document.
Essential Test Plan Components and Their Purpose
| Component | Core Purpose | Key Information to Include |
|---|---|---|
| Test Scope | Defines the boundaries of the testing effort. | Features to be tested, features explicitly not tested, and target user platforms. |
| Test Objectives | States the specific goals of the testing cycle. | Measurable success criteria, such as pass rates or defect density targets. |
| Entry & Exit Criteria | Sets the start and stop conditions for testing. | Prerequisite conditions for starting, and quality benchmarks for completion. |
| Test Environment | Details the hardware and software configuration. | Server specs, operating systems, browsers, database versions, and any third-party tools. |
By clearly defining the setup for hardware, software, and data, you ensure that every bug your team finds is a genuine product defect, not just a symptom of a misconfigured environment. This foundational work—defining scope, objectives, criteria, and environment—is what separates a test plan that just gets filed away from one that truly drives quality and delivers real value.
Defining Your Testing Strategy and Approach
Now that you've laid the groundwork, it's time to get into the nuts and bolts of your actual testing. This is where you shift from the "what" to the "how." Think of your testing strategy as the operational core of your entire plan—the specific methods, tools, and workflows your team will actually use to get the job done.
A well-defined strategy is the antidote to chaos. It cuts through ambiguity and makes sure everyone on the team, from the junior tester to the lead developer, is on the same page and executing their work consistently.
This section isn't just a laundry list of tasks. It's a carefully considered approach that's built around your project's unique risks and requirements. It’s also important to distinguish between the high-level goals of a test strategy and the project-specific actions of a test plan. If you're fuzzy on the difference, our guide on test plan vs. test strategy in software testing is a great place to clear things up.
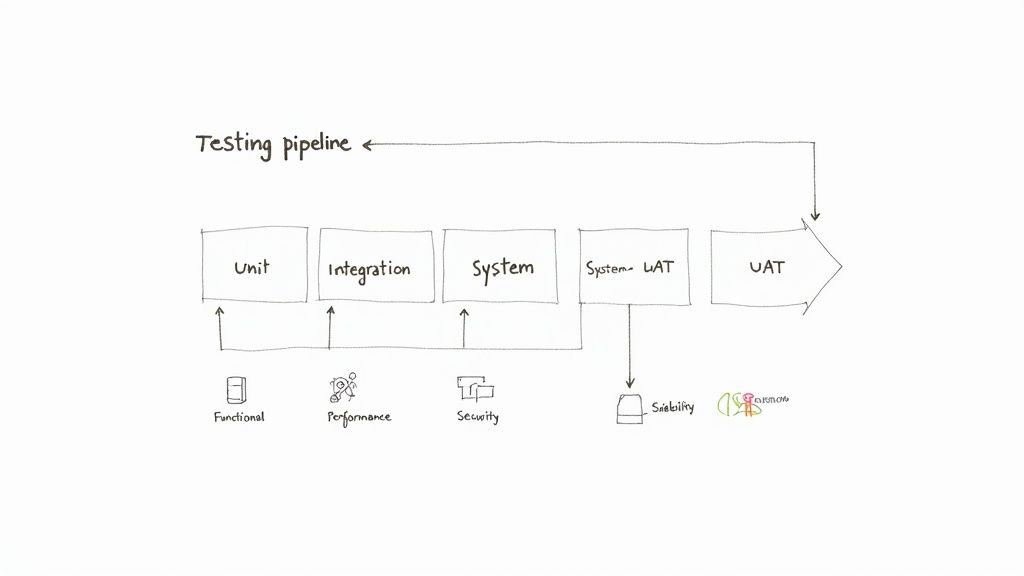
Choosing Your Testing Levels
Good software testing isn't a one-and-done event. It's a multi-layered process with checks and balances at different stages of development. Your plan needs to be crystal clear about which levels of testing you'll perform and who owns them. This approach is all about catching defects as early—and cheaply—as possible.
- Unit Testing: This is your first line of defense. It's usually handled by the developers themselves to make sure individual code components or functions work as expected in isolation.
- Integration Testing: Once the individual pieces are confirmed to work, this level checks how they play together. It’s all about finding friction and bugs in the interactions between different modules.
- System Testing: This is where the QA team really shines. The entire, integrated application is tested from end to end against the formal requirements to validate the complete system.
- User Acceptance Testing (UAT): The final hurdle. Real end-users or product owners get their hands on the software to confirm it meets their needs and is truly ready for the real world.
Selecting the Right Testing Types
Beyond the levels, your strategy has to pinpoint the right types of testing. There's no one-size-fits-all answer here; the mix you choose depends entirely on your product. An e-commerce platform, for example, will need a heavy dose of performance and security testing. A simple marketing website might focus more on usability and cross-browser compatibility.
Some common testing types you'll want to consider are:
- Functional Testing: Does the software do what it's supposed to do? This verifies each feature against the specs.
- Performance Testing: How does the system hold up under pressure? This looks at speed, responsiveness, and stability under various load conditions.
- Security Testing: This is where you proactively look for vulnerabilities to ensure the system protects its data and functions securely.
- Usability Testing: How does it feel to use the application? This assesses how intuitive and user-friendly it is from a real user's perspective.
- Compatibility Testing: Does it work everywhere it needs to? This checks performance across different browsers, operating systems, and devices.
Your test plan should always justify why you chose a particular testing mix. For instance: "Given the high volume of expected user traffic and the sensitive customer data involved, we will allocate 40% of our execution time to performance and security testing."
Defining the Defect Management Process
Let's be honest: finding bugs is only half the battle. If you don't have a solid process for managing them, you're just creating noise. A clear defect management process ensures bugs are tracked, prioritized, and squashed efficiently, preventing critical issues from ever falling through the cracks.
Your plan needs to spell out this entire workflow, leaving no room for interpretation:
- Reporting: How are defects logged? Name the tool (like Jira or Azure DevOps) and define the mandatory fields (e.g., summary, steps to reproduce, severity, priority).
- Triage: Who reviews incoming bugs? Set up a regular meeting or a clear process for assessing bug severity and assigning it to the right developer. No more bugs sitting in limbo.
- Resolution: What are the SLAs for fixes? Define expected turnaround times based on priority. For example, a critical bug must be fixed within 24 hours.
- Verification: Once a developer marks a bug as "fixed," who on the QA team is responsible for re-testing and confirming the fix in the staging environment?
A structured process like this turns bug hunting from a chaotic free-for-all into a predictable, measurable part of your workflow. It keeps dev and QA teams perfectly aligned. If you want to dive deeper into this, check out these top quality assurance tips for test case planning processes for more great insights.
Allocating Resources and Setting Timelines
A brilliant strategy is just a document until you assign people, time, and tools to make it happen. This is where your test plan gets real—it's the logistical core that turns your high-level goals into a practical, day-to-day operation.
Frankly, without a clear handle on resources and a realistic timeline, even the most well-defined scope is doomed from the start. This part of the plan answers the critical "who," "when," and "what" of your testing effort, making it a true project management tool.
Assembling Your QA Team and Defining Roles
Your testing effort is only as strong as the team behind it. The first step is figuring out who you need and, just as importantly, what each person will own. Ambiguity in roles is a surefire way to have critical tasks fall through the cracks.
For most software projects I've worked on, the testing roster usually includes these key players:
- QA Lead: Think of them as the conductor of the orchestra. They own the test plan, coordinate all testing activities, triage defects, and are the main point of contact for stakeholders. The final sign-off rests on their shoulders.
- Manual QA Tester(s): These are your hands-on experts. They execute test cases, perform exploratory testing to find those tricky edge cases, and meticulously document every bug. They're your frontline soldiers in the battle for quality.
- Automation Engineer: This specialist focuses on building and maintaining the automated test suite. They write the scripts that handle regression tests and performance checks, freeing up manual testers to focus on more complex, human-centric validation.
- Developer Support: While not a dedicated QA role, you absolutely must allocate developer time for bug fixes and environment support. Your plan should name a point person or outline a clear process for getting this support quickly.
Getting these roles down on paper prevents the classic "I thought someone else was doing that" problem that plagues so many projects.
Creating a Realistic Test Schedule
A timeline without considering dependencies isn't a schedule; it's a wish list. Your test schedule has to be tightly integrated with the overall project plan, especially the development milestones. A common mistake I see is teams creating a QA schedule in a vacuum, which only leads to immediate conflicts and delays.
A solid test schedule has to include:
- Key Milestones: These are the major checkpoints, not just dates on a calendar. Think in terms of events: "Test Environment Ready," "Test Case Design Complete," "Regression Cycle 1 Kicks Off," and "UAT Sign-off."
- Dependencies: What absolutely has to happen before a testing activity can begin? For example, you can't start test execution until the dev team delivers a stable build. Documenting these dependencies makes it painfully obvious where the potential bottlenecks are.
- Task Durations: Put real numbers on how long each phase will take. The best way to do this is to look at historical data from similar projects. If a regression cycle took five days last time, don't budget for two now unless something has fundamentally changed.
- Buffer Time: Things will go wrong. It's not a question of if, but when. A critical bug might block all further testing, or the test environment could go down. I always build in a 15-20% buffer to absorb these surprises without derailing the entire release.
A schedule is more than a calendar; it's a communication tool. When stakeholders ask, "Are we on track?" your test schedule provides a data-driven answer, not just a gut feeling.
Defining Your Test Deliverables
Finally, your plan needs to spell out exactly what artifacts the testing process will produce. These deliverables are the tangible proof of your team's progress and the product's quality. They’re the official record.
I like to think of deliverables in three phases: before, during, and after testing.
Before Testing Starts:
- The Test Plan: The very document you're creating.
- Test Cases: Detailed, step-by-step instructions for validating specific features.
- Test Design Specifications: A higher-level document outlining the overall structure and approach for your tests.
During the Testing Cycle:
- Test Execution Logs: A running record of which tests were run, by whom, and their pass/fail status.
- Defect Reports: Comprehensive reports for every bug found, including severity, priority, and clear steps to reproduce it.
- Test Summary Reports: Daily or weekly status updates for stakeholders, showing progress against the plan.
After Testing is Complete:
- Final Test Summary Report: This is the big one. It’s a complete overview of the entire testing effort, packed with key metrics like test case pass rates, defect density, and a final quality assessment. This is the document that supports the "go/no-go" release decision.
By defining these resources, timelines, and deliverables upfront, you build a system of accountability and transparency that empowers your team and gives stakeholders real confidence that quality is under control.
7. Managing Risks and Coordinating Your Team
Let's be honest: no project goes exactly as planned. A test plan that only maps out the sunny-day scenario isn't a plan at all—it's a wish list. This is where we move from simply planning the work to planning for what happens when things go sideways. It’s how your test plan becomes a living document that actually helps you navigate the chaos.
Thinking about risks isn't about being negative; it's about being a professional. When you identify what could go wrong ahead of time, you can have smart, practical responses ready to go. You stop firefighting and start managing. This proactive mindset is what separates the teams that hit their deadlines from those who are always one step behind.

Running a Practical Risk Analysis
You don't need a PhD in statistics to do a good risk analysis. It's really just a structured brainstorming session. Get your team together—devs, QAs, a product owner if you can—and ask a simple question: "What could derail this project?"
You’ll find that a few usual suspects pop up almost every time.
- Schedule Risks: This is the big one. An unrealistic deadline from the start, a key developer getting sick, or a feature delivery slipping can squeeze your testing window down to nothing.
- Resource Risks: What happens if the staging server you rely on crashes? Or if your top automation engineer quits mid-sprint? A sudden gap in people or infrastructure can bring testing to a grinding halt.
- Technical Risks: Maybe the application is incredibly unstable in the test environment, or a third-party API you depend on keeps going down. These are often out of your direct control, but you absolutely have to plan for them.
- Requirement Risks: We've all been there. Vague requirements or constant "small" changes (scope creep) make it feel like you're trying to hit a moving target. Finalizing test cases becomes impossible.
Once you have a list, the next move is to figure out which ones to worry about most. A simple way to do this is to rate each risk by its likelihood (is it likely to happen?) and its impact (how bad will things get if it does?). Put your energy into the high-likelihood, high-impact problems first.
The point of risk management isn't to create a risk-free project—that's a fantasy. The goal is to tackle uncertainty head-on by having a solid Plan B for the problems you're most likely to face.
Building Smart Mitigation and Contingency Plans
For every serious risk, you need two lines of defense: a mitigation strategy and a contingency plan. Think of it this way: mitigation is what you do to prevent the problem, and contingency is what you do after the problem happens anyway.
Let’s use the classic tight deadline risk.
- Mitigation Strategy: "We'll start writing test cases while the feature is still in development and automate the core regression suite from day one to speed up execution." This is your proactive move.
- Contingency Plan: "If the final build is delayed by more than 3 business days, we will get sign-off to de-scope testing for P3 (low-priority) features and focus 100% of our effort on the critical payment workflow." This is your break-glass-in-case-of-emergency plan.
Laying this out shows stakeholders you’re not just hoping for the best—you have a mature process for dealing with reality.
To help you get started, here’s a look at some common risks we see on projects and how we typically approach them.
Common Testing Risks and Mitigation Strategies
A practical guide to identifying potential testing roadblocks and planning effective responses to keep the project on track.
| Risk Category | Example Risk | Potential Impact | Mitigation Strategy |
|---|---|---|---|
| Schedule | Unrealistic deadlines or delays from the development team. | Inadequate time for thorough testing, rushed cycles, poor quality release. | Start test case design early, automate high-priority tests first, and negotiate a clear, prioritized scope. |
| Resource | A key QA team member leaves, or the test environment is unstable. | Testing bottleneck, slowed progress, inability to execute tests. | Cross-train team members, document key processes, and have a dedicated environment support contact. |
| Technical | The application is too buggy to test, or a third-party API fails. | Blocked testing, inaccurate results, inability to validate end-to-end flows. | Implement strict smoke tests for every new build; use API stubs or mocks for unstable dependencies. |
| Requirements | Vague user stories or frequent scope creep. | Reworked test cases, missed requirements, testing the wrong functionality. | Involve QA in requirement refinement sessions and establish a formal change request process for any scope changes. |
Thinking through these scenarios before they happen allows you to respond with a calm, pre-approved plan instead of a last-minute panic.
Fostering Great Team Coordination
A brilliant risk plan is worthless if the team can't communicate. This is especially true when working with nearshore or distributed teams where you can’t just yell across the room. Your test plan needs to be the rulebook for how everyone stays in sync.
Make sure you define a few key communication rituals:
- Daily Stand-ups: A non-negotiable, 15-minute meeting. What did you do yesterday? What are you doing today? Are you blocked? This is the fastest way to surface problems.
- Defect Triage Meetings: Get the QA lead, a product owner, and a dev lead in a room twice a week. The goal is simple: review new bugs, agree on their priority, and assign them out. This stops defects from getting lost in the backlog.
- A Clear Escalation Path: A tester finds a showstopper—a bug that blocks all other testing. What now? The plan must spell out exactly who to notify immediately (e.g., the QA Lead and Dev Lead via Slack) and what information to provide. This prevents wasted hours while a critical issue sits unaddressed.
By defining both your risks and your communication playbook, the test plan becomes the true command center for your entire quality effort. It ensures everyone on the team knows what to do when things are going right, and more importantly, knows exactly how to react when they inevitably go wrong.
Frequently Asked Questions About Test Plans
Even with a great guide, putting pen to paper (or fingers to keyboard) on your first test plan always brings up a few questions. It's a constant juggle between getting the details right, keeping things clear, and making sure the plan is actually useful.
Let's walk through some of the most common hurdles people face. Getting these answers straight will help you create a practical tool, not just another document that collects dust.
How Detailed Should a Test Plan Be?
Ah, the million-dollar question. The honest answer is: it depends. Finding the right level of detail is a real balancing act, and it comes down to your project's complexity, any industry rules you have to follow, and how experienced your team is.
For a small, agile project with a crew of seasoned pros, a lightweight plan might be perfect. You'd focus on the big picture—scope, overall strategy, and key milestones—and trust the team to handle the rest.
On the other hand, if you're building a complex financial platform or a medical device app, you need an exhaustive document. We're talking detailed test cases, precise environment configurations, and a full-blown risk mitigation plan to satisfy strict compliance.
A good rule of thumb is to make the test plan your single source of truth for QA. It should have enough detail for a new team member to get up to speed without needing a two-hour-long meeting, but it shouldn't be so dense that nobody wants to read it.
What Is the Difference Between a Test Plan and a Test Strategy?
This is a big one—people mix these up all the time, but they serve very different purposes.
A Test Strategy is the 30,000-foot view. It's a high-level document, usually defined at the company or department level, that outlines the overall approach to quality. It’s fairly static and covers things like testing standards, preferred tools, and core principles that apply to all projects. It answers the big question: "How do we do quality assurance around here?"
A Test Plan, however, is a ground-level, tactical document for a single project. It takes the guiding principles from the strategy and applies them to a specific software release. It digs into the nitty-gritty: the scope, objectives, resources, schedule, and risks for that project alone. Think of it this way: the strategy is your long-term vision for quality, while the plan is the turn-by-turn roadmap for one specific journey.
Can I Use a Template to Write a Test Plan?
Not only can you, but you absolutely should! Starting with a template, especially one based on a well-known standard like IEEE 829, is a fantastic idea. It gives you a solid structure and acts as a safety net, making sure you don't overlook critical sections like entry/exit criteria or risk analysis.
But here’s the crucial part: don’t just fill in the blanks. The biggest mistake I see is teams treating a template like a rigid checklist.
You have to mold it to fit your project. Some sections will need a ton of detail, while others might be less relevant and can be trimmed down. The template is a guide for your thinking, not a substitute for it. A well-customized template is a powerful accelerator; a blindly completed one is just more paperwork that gets ignored. The real value is in tailoring it to the unique challenges and goals you're facing right now.